
When we decided to visit Northern Norway, we definitely wanted to hike in Lofoten islands. More, we had a vision of beautiful mountains rising from the sea, rocky peaks and completing all the best hikes in Lofoten! Enjoying breath-taking views of villages from mountain tops.
We never thought of boggy paths, strong winds, low cloud and rainy days. Hope you are smiling at this point, as I managed to catch you here and that your vision is similar to ours.
We have visited Lofoten twice; first, in mid-August and this first visit was rather wet, damp and gloomy; we often ended up with boots completely drenched. We have not walked as much as planned and kept trying to chase the sun most of the time. I guess what I am trying to say is: keep dreaming of amazing views but be prepared for rain, wind and low temperatures, even in the summer! Check out this article to learn how to prepare for a visit to Lofoten and what to expect!
As we all know there is not much fun in being cold and drenched. This did happened to us, feeling a bit unfulfilled after the first visit, we returned to Lofoten second time in mid-July following year (I know lucky us!), and I am so glad we did. Second visit was a totally different experience – we enjoyed midnight sun, sunny & warm days and not much rain. We maybe used rain jackets once, if ever. Some paths were still boggy but not to the same extend as previous year.
So you probably already see that I am trying to let you learn from our experience, you need to be well prepared for your hiking holidays in Lofoten islands! As beautiful as the archipelago is, Lofoten’s weather is unpredictable and can change rapidly.
A few facts about Lofoten’s mountains:
- the trails are often very steep and boggy
- weather conditions can vary even between the neighbouring islands
- the top of the mountain can feel much colder than the trail head below
- even easy trails in Lofoten may be harder than what one is used to
- most trails are unmarked but normally the path is well trodden
- often there is very limited parking space at trail heads, so it’s best to start your hike early in the morning
- finding a trail head can sometimes be tricky
- navigation is not normally a problem, but be aware of the drops or cliffs in misty or cloudy conditions
- IMPORTANT: Reinebringen isn’t the only mountain with amazing views! In fact, every peak provides stunning views. However, Reinebringen viewpoint is the busiest trail on Lofoten! Personally we opted out, so you won’t find any info about Reinebringen in this post.
- you can easily use the online map for navigation, we planned most hikes using online Norgeskart map (link) which comes very handy as it reflects most hiking trails and paths! Update: There is now also a Norgeskart App available, which is awesome!
And here it is, a compilation of 16 Most Stunning Hikes in Lofoten archipelago; listed by island, starting from west to east.
16 Best Hikes in Lofoten archipelago
Moskenesoya island
1.Tindstinden
2.Munken and Munkebu Hut
3.Hermannsdalstinden
4.Ryten and Kvalvika Beach
5.Roren and Yttersand Beach
Flakstadoya island
6.Stornappstinden
Vestvagoya island
7.Justadtinden
8.Veggen
9.Holandsmelen
10.Mannen
Gimsoy island
11.Hoven
Austvagoya island
12.Matmora
13.Festvagtind
14. Floya and Djevelporten
15.Blatinden
16.Tuva
Moskenesoya island
Where to stay on Moskenesoya
Moskenesoya island offers a wide range of stunning hikes hence it is a great ‘base’ island!
| Accommodation | Rating | Comment |
| Eliassen Rorbuer | 8.6 /10 | Traditional ‘red house’, located in Hamnoy, giving you the opportunity to stay in one of the most iconic Lofoten’s locations! |
| The Manor House | 9.4/10 | Spacious house with private parking in Reine. Garden views and terrace for guests to enjoy. |
| Lofoten Å HI hostel | 7.6/10 | Good value for money hostel in village Å. All rooms have shared bathrooms. |
| Lofoten Bed & Breakfast Reine – Rooms & Apartments | 8.2/10 | Bed and breakfast option for a stay in Reine. |
| Moskenes Camping | 8.4/10 | The best campsite on Moskenesoya, perfect gateway for a day trip to Vaeroy Island! |
1.Tindstinden 490 masl
Difficulty: moderate/hard
Distance: 5 km
Total time: 3 hours
Elevation gain: 460 metres
Judging by the distance and height of Tindstinden, don’t make a mistake and think that a hike to its top is going to be a chilled, easy walk to a viewpoint.
In order to conquer Tindstinden you’ll have to find your way thru grass-and-rock meadow at the head of lake Stuvdalsvatnet; the meadow is far from flat or even. Further, you’ll have to pass several dips (some spots are secured with ropes or chains to ensure safe crossing). And that’s before you actually get to the foot of the mountain and start the steep climb!
Tindstinden is an exciting mountain, you won’t be bored along the way, most importantly once you reach higher ground you’ll be awed by stunning panorama over Moskenesoya island!
The ridge is a mix of grass and rock, wide enough to feel comfortable and focus on the scenery rather than stress out and fight vertigo. Of course, there are narrower sections along the way, but not very exposed. It was worth the effort, wasn’t it?! To return, carefully retrace your steps down.
What we enjoyed about hiking up to Tindstinden’s top: the hike is varied and exciting! Summit views were amazing, from the top we saw most of Moskenesoya island, we were directly over village A, the view stretched as far as small islands at the western end of archipelago, including Vaeroy. Read more about a hike to Tindstinden (including a map).
Return to top of page
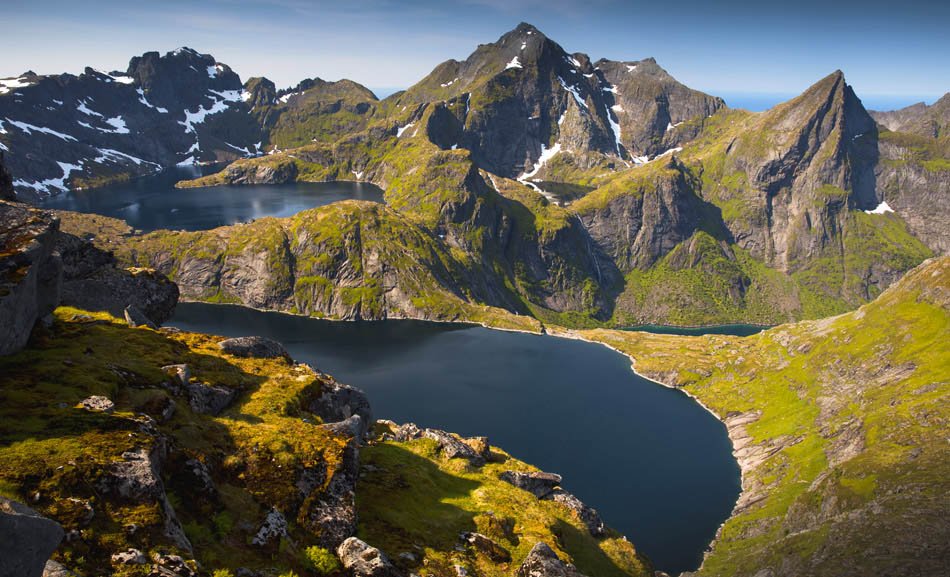
2.Munken 797 masl and Munkebu Hut
Difficulty: moderate with some steep sections
Distance: 12km
Total time: 7-8 hours
Elevation gain: 910 metres
Hike to the top of Munken will take you thru some of Lofoten’s most dramatic landscapes, at the western end of Lofotodden National Park. The easiest and most popular trail to Munken starts in Sorvagen and passes the beautifully located Munkebu Hut. Initially the trail rises gently as is runs along two lakes, at the top of the second lake you’ll finally start gaining height, climbing thru low woodland, negotiating rock ribs. This very section is secured with chains to make it easier to climb up smooth rock, and later safely climb down on your return. As you climb higher the terrain becomes wilder and scenery breath-taking. You’ll be surrounded by high mountains and rocky tops. A short section of the path follows a stream with lovely cascades, then the terrain opens up and soon you’ll be on high ground, and already see Munkebu Hut in the distance! It’s beautifully located over two small lakes, with a bit of luck the lakes will reflect the surrounding rocky summits!
Munkebu Hut is a perfect spot to have a break on your way to Munken, which is approximately 45-60 mins of steep climb away. Although the highest top of Munken is inaccessible (rock climbing only!), view from its spacious northern top will satisfy the most demanding hiker! It doesn’t only stand among other dramatic mountains of Moskenesoya; it also reveals fjords and lakes! There is so much to take in from the top of Munken! The hike is incredibly rewarding, in exchange for a 3-3.5 hours walk you’ll enjoy some of the best views in Lofoten, including the mighty Hermannsdalstinden! Once you’re satisfied, retrace your steps to Munkebu hut and further to the car park.
Munken is definitely of the peaks not to be missed during your visit in Lofoten. The views are simply stunning and breathe-taking, the whole trail is beautiful. There is one very boggy section, which even during dry weather was challenging to cross, so we definitely do recommend to wear proper hiking, waterproof boots.
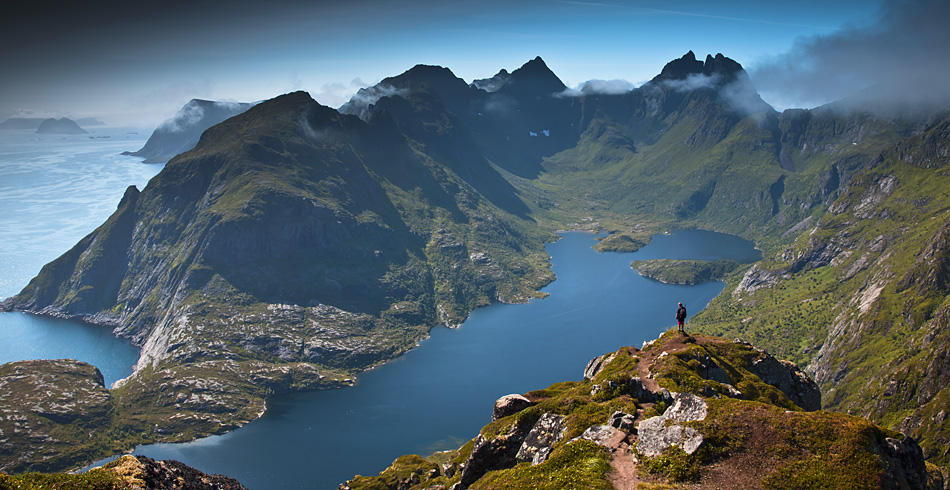
3.Hermannsdalstinden 1029 masl
Difficulty: hard/expert
Distance: 23 km
Time: 12-13 hours
Elevation gain: 1774 metres
Hike up to Hermannsdalstinden’s top, the highest mountain of Moskenesoya, was the hardest we completed in Lofoten; despite splitting it over 2 days with an overnight camp near Munkebu Hut. Hermannsdalstinden is legendary for its difficulty and length, hence we believe that the best way to conquer it, is by splitting the hike over 2 days. Want to find detail of how we did it? Read this article.
Set off from Sorvagen in the morning and walk to Munkebu Hut. The trail to the hut is rather popular and you will meet many hikers along the way. However, many of them will finish at the hut or walk up to Munken, and only very few continue up to the top of Hermannsdalstinden.
Munkebu hut is surrounded by jagged peaks and small lakes, I guarantee that when you see it on the approach, it will take your breath away. What a perfect location for an overnight stay!
It felt safe to leave our belongings in the tent and carry forward only the most necessary items. Hermannsdalstinden stands proud (and still far away) from Munkebu Hut, so further hike to the summit is a strenuous walk/scramble of remaining 4 km which takes approximately 3.5 -4 hours and passes some of the most beautiful landmarks in Lofoten.
Views along the way are stunning in all directions and give great excuses to stop and rest. Final ascent to Hermannsdalstinden is hard, very steep at times and route finding can be tricky, especially crossing the boulderfield just below the summit. Otherwise the path is well visible and easy to follow, despite being pretty much unmarked. There are couple of steep and tricky sections, which can cause greater difficulties when wet. Therefore climbing this peak should not be taken lightly.
What we enjoyed about hiking up to Hermannsdalstinden: overnight camp in the wild mountains, we enjoyed the time at the top, all by ourselves! Have I mentioned the scenery? Basically it doesn’t get any better on the island, you are at the roof of Moskenesoya, after all!
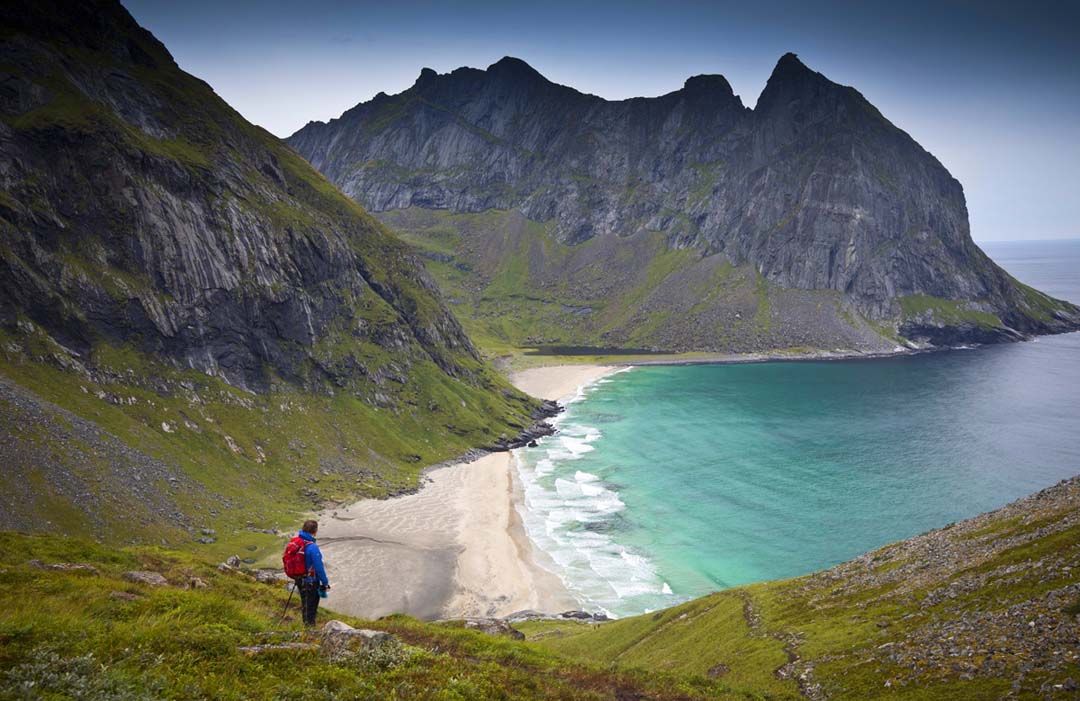
4.Ryten 543 masl and Kvalvika Beach
Difficulty: moderate
Distance: 7.5 km
Time: 5-6 hours
Elevation gain: 560 metres
Unique landscape of Lofoten islands give almost endless opportunities for hikes with beach view, and it’s really easy to find a splendid mountain hike finished off with a visit to a sandy beach! Hike to Ryten offers much more than just dramatic views, it can easily be connected with exploration of Kvalvika, one of the most iconic beaches in Lofoten! We recommend doing the hard part first and start the day with a climb to Ryten, and if you feel like it, a steep descent to the beach. Keep in mind that the initial section of Ryten hike can be wet, so waterproof boots are recommended! Once you reach the top of Ryten you’re in for unspoilt and endless ocean views, as well as a glimpse of Kvalvika. To get to the beach: descent from Ryten to the lake and take the small path down, along a stream. Be careful as this section is steep and the path is rough. In no time you’ll be at the beach! Make the most of it (!) explore the amazing stripe of white sand take a break, sunbathe!
During our visit to Lofoten we greatly enjoyed the Ryten and Kvalvika Beach hike, check out this article for detailed information and a map.

5.Roren 294 masl and Yttersand Beach
Difficulty: easy
Distance: 2 km
Time: 2.5 hours
Elevation gain: 290 metres
A short hike to Roren should definitely be included in your Lofoten itinerary. Despite being only a viewpoint rather than a separate mountain Roren offers astonishing views to Flakstad bay and island, as well as the eastern tip of Moskenesoya, and most importantly to Ytterand Beach!
What’s so special about a hike to Roren? It’s short enough to be easily manageable in the evening, in time for sun setting over the nearby beach! Roren can be describes as a bump along the hill line, not exactly a top, but a decent viewpoint, and we strongly encourage you to give it a go! In exchange for a 2 hours hike you’ll be rewarded with outwardly scenery! The beach below will invite you for a stroll once you descend to the sea level. If you feel like, you can explore the hill further, it’s a flat-ish plateau overgrown with berry bushes, moss and grass; it gives a lot of freedom to roam and explore further corners of the hill edge!!!
Detailed info about hike to Roren and exploration of Yttersand beach
Flakstadoya island
Where to stay on Flakstadoya
| Accommodartion | Rating | Comments |
| Kafe Friisgarden | 7.5 /10 | located within walking distance to iconic Ramberg Beach |
| Cottage and beautiful beach | 9.6/10 | perfect base for hiking to Stornappstinden |
| Cabins in Nuksfjord | 8.6/10 | Stay in a typical Lofoten rorbu. |
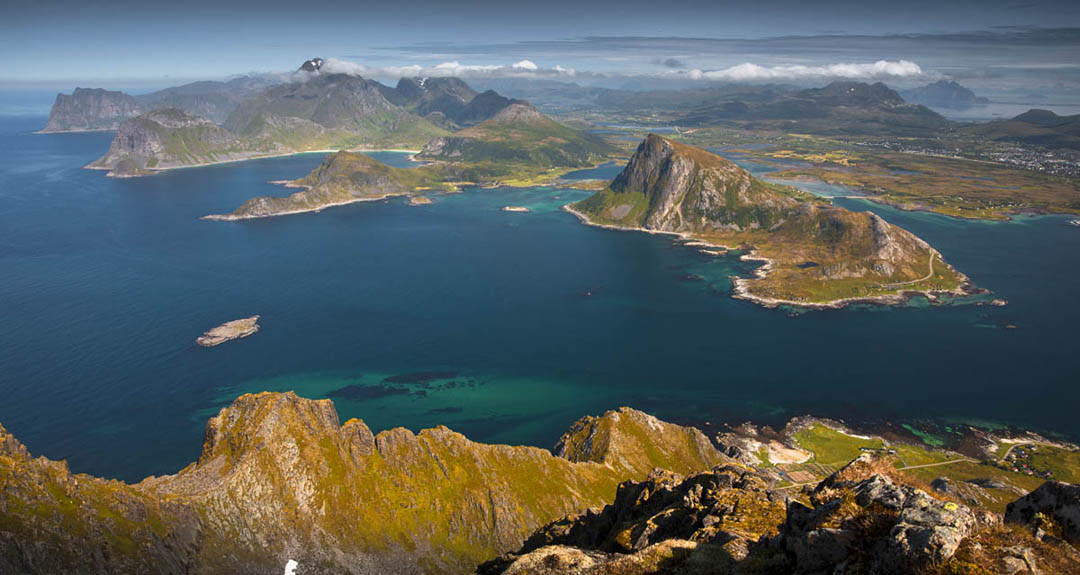
6.Stornappstinden 740 masl
Difficulty: moderate with some steep sections
Distance: 5.6 km
Time: 4 hours
Elevation gain: 683 metres
Stornappstinden is one of the peaks at the eastern edge of Flakstadoya island, which makes it a perfect lookout to islands further east, with the nearest landmarks being Offersoykammen, and famous Haukland Beach area. Standing at the top of Stornappstinden you’ll see other amazing peaks, lakes, fjords and I guarantee you won’t ever have enough of it!
A hike to Stornappstinden starts at the ski centre in Napp, initially it rises gently as it follows ski trails, but soon the path reaches the foot of the mountain and a steep, strenuous climb begins. Despite being steep and eroded the path is easy to follow and reaches the top quite suddenly! As soon as you see the view you’re sure to forget all the effort and sweat required to climb Stornappstinden. The sights are simply breath-taking! All the small islands down below, mini-beaches and rugged coast, mountains stretching in all directions make an amazing impression and prove endless beauty of Lofoten.
Stornappstinden top is very spacious, take tour time to enjoy the view! Once your eyes and soul is satisfied and you’ve rested carefully retrace your steps down to the ski centre.
Vestvagoya island
Where to stay on Vestvagoya
| Accommodation | Rating | Comments |
| 8.4/10 | Buzzing town of Leknes is a perfect base for exploring Vestvagoya island and this is affordable accomodation for those who wants to stay in the town. | |
| Lofoten Hiking Lodge | 9.4/10 | Away from the hustle of Lofoten, this lodge provides solitude and it is perfectly located to watch Northern Lights. |
|
| 8.4/10 | Small cabin at the end of the road, perfect for midnight sun! |
| Beautiful apartment by the sea | 9.5/10 | Exceptional house within a walking distance to famous Lofoten baches. |
7.Justadtinden 738 masl
Difficulty: easy/moderate
Distance: 13 km
Time: 4-5 hours
Elevation gain: 700 metres
We can certainly say that Justadtinden is the most underrated hike in Lofoten. It’s located near Leknes and I think it’s overshadowed by other amazing landmarks in the area, like the stunning Haukland and Utakleiv beaches.
Why you should hike to the top of Justadtinden? The trail is quite long as for Lofoten standards, hence not chosen by many. Along the way you will find peace and meet only a handful of other fellow walkers at most. Hiking experience is unlike in other parts of Lofoten, the path wanders around rocks and small dotty lakes, and gives the feeling of solitude. We really loved it!
The trail is unmarked but easy to follow. In terms of difficulty it’s a medium difficulty hike, with the greatest elevation gain at the direct climb to the summit. Final climb is steep but on a clear day you will be rewarded with stunning top views.
During our hike to Justadtinden the top was covered by clouds and we had no summit views whatsoever, but despite the fact we enjoyed the hike and the peaceful experience. Read our story to find the details of Justadtinden hike.

8.Veggen 489 masl
Difficulty: moderate, but steep
Distance: 2.8 km
Time: 3 hours
Elevation gain: 444 metres
Veggen is one of the two tops located exactly between Lofoten’s two most stunning beaches. A hike to Veggen offers amazing view to Uttakleiv beach as well as Haukland Beach, and other mountains in the area, as well as the wet lands near Leknes.
It’s a short hike, but not to be underestimated, as it’s very steep throughout. The best starting point to climb Veggen is Uttakleiv beach, see our dedicated article for detailed information.
Initially the trail passes lovely green meadows only to get to the hillside, and the climb begins. At first the path is muddy, as it follows a small stream, but as soon as you reach a saddle the path becomes perfectly dry, albeit incredibly steep. Take care climbing the heathery slope of Veggen, stunning views are there to distract you from the hardship of the climb. Fingers crossed you’ll spot a couple of eagles which nest on Veggen’s crags!
Final part of the hike, just before the very summit is a short grassy ridge, finished off with a cairn (pile of stones) at the western end. That’s the summit of Veggen, you made it! Take your time to take in the scenery, getting to that point did cost some effort, so don’t rush back! Enjoy the view of Haukland beach, below, on the left side, and its continuation Vik beach, as well as view to distant peaks of other islands. Veggen is a fantastic viewpoint over the beaches and this little corner of Lofoten and is noticeably less busy than Mannen.

9.Holandsmelen 434 masl
Difficulty: easy
Distance: 4 km
Time: 2.5 hours
Elevation gain: 410 metres
Holandsmelen is another example of a much overlooked hike, similarly to Justadtinden (above). This hill is overshadowed by its spectacular neighbour Mannen. Despite having a fabulous hiking experience on offer it stays relatively quiet, just being passed by crowds on their way to Haukland and Uttakleiv beaches.
Why you should include Holandsmelen in your Lofoten hiking itinerary? It’s a straightforward walk to hill directly over Vik beach! The difficulty of a hike to Holandsmelen is actually following the path. Let me explain, the hike starts at a small car park past Hogtaen (directions). Initially follow a rough track up from the car park, towards the trees. Once you reach the tree line the track changes into a rough path which meanders along the deer fence. Soon you’ll come to an open space, like a high meadow, which you have to cross, Holandsmelen top is to your right. The grass and heather meadow is wet in places and you’ll find that it’s actually quite tricky to keep to the path still, what is more -the path will fork numerous times, or occasionally disappear. If you loose the path temporarily, simply walk directly towards the top of Holadsmelen, I guarantee you’ll come across another path sooner or later! Final approach to the top is the steepest section of the hike and will take you to the spacious rugged summit. Nearer the top the path becomes rocky, and once you reach the summit ridge, follow it to the left. Top of Holandsmelen is an unmarked, bump made of grass and stone. The most prominent landmarks seen from the summit are Vik and Haukland beach, Veggen and Mannen as well as Offersoykammen!
We expecially recommend a hike to Holandsmelen in the morning or late afternoon, to ensure you see the picturesque scenery around in warm, soft light.
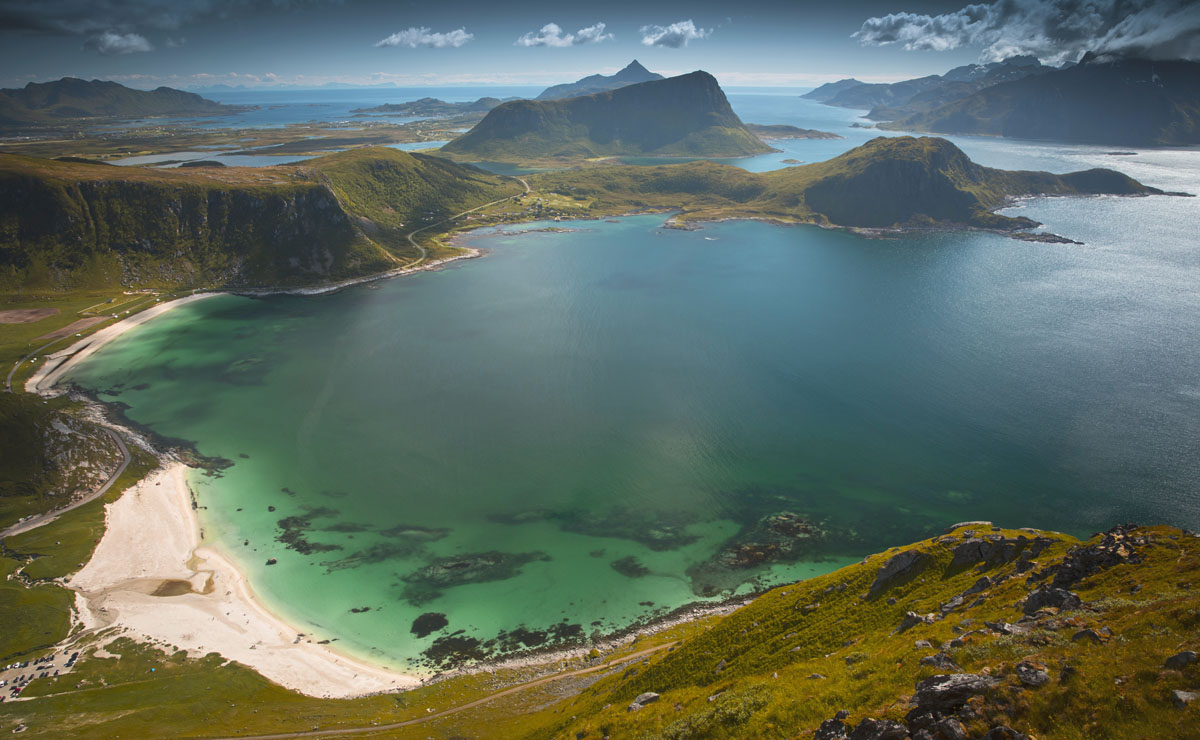
10.Mannen 400 masl
Difficulty: easy
Distance: 4 km
Time: 2-3 hours
Elevation gain: 370 metres
Mannen, is by far, the most popular hiking destination in Haukland and Uttakleiv area! And that’s for several reasons: stunning views to the beaches, especially to Haukland beach, a fine hiking experience, a straightforward but incredibly rewarding hike to the best viewpoint in the area! A hike to Mannen cannot be overrated.
We admit, we were reluctant to conquer Mannen, due to its popularity, but eventually we did hike to the top, without regret! If we were to pick only one short hike in Haukland and Uttakleiv, undoubtedly it would be Mannen!
Getting to the top of Mannen requires some effort, initially you have to climb to the ridge over the Uttakleiv tunnel, then follow the gently rising ridge to the very top. There is a good path, for most of the way, wet in places with some muddy sections nearer the top.
The top is made of rock, grass and heather and quite spacious to accommodate many keen walkers!
We believe that Mannen is the most fantastic viewpoint over Haukland Beach as it rises directly above! Eagle-eye view of Haukland beach is spectacular; white sand surrounded by juicy green pastures and emerald water. The top also give a unique overview and insight of the Veggen hike.
You can hike to Mannen from Uttakleiv beach, but it’s much shorter from Haukland! On your way back, if you still fancy a further walk you can descent to Uttakleiv and retun to Haukland along the coastal path!
In Haukland / Uttakleiv area there are 3 hills which provide birds-eye overlook of the beaches, pastures and dunes; these are Veggen, Holandsmelen and Mannen (all detailed in this post!), however we believe that Mannen provides the best hiking experience (despite the crowds) and the best views!
Gimsoya island
Where to stay on Gimsoya
| Accommodation | Rating | Comments |
| Wooden house for up to 5ppl on Gimsoya | 4.9/5 | Well equipped house in a beautiful location! |
| Cabin in the middle of Lofoten | 4.8/5 | warm and comfortable stay with seaview! |
11.Hoven 368 masl
by Oana from Wild Planet Blog
Difficulty: easy
Distance: 3.8 km
Time: 2 -3 hours
Elevation gain: 350 metres
Hoven is a small peak located on the island of Gimsøya, rising to 368 metres above sea level. It offers great 360° coastal views over the fjords, Hovsvika beach and towards Vesterålen archipelago at northeast.
Hiking trail to the top of Hoven is probably one of the easiest trails in Lofoten archipelago, suitable for people of all ages and a great place to watch the midnight sun.
A total length of this hike is 3.8 km round trip and it took us around 2 hours to complete. To reach Hoven by car set up your navigation to a place called “Lofoten Links” (directions), which is a golf course, located right next to the start of the trail (signposted).
Like all trails in Lofoten, there are some more demanding sections, but all is easily manageable thanks to the vegetation around the trail.
We visited Lofoten in mid August and the parking lot was almost empty with no parking fee.
During our visit, the weather was really sunny and dry, but it seems that even on a rainy day the track won’t be too slippery.
What I really liked about Hoven was that once you get to the peak there are several places to wander around, all while still having the possibility of experiencing some scary vertical cliffs if you wish to do so. This was also a great photography spot where you can capture the typical landscape of Lofoten.
Wild Planet Blog @ YouTube
Austvagoya island
Where to stay on Austvagoya island
| Accommodation | Rating | Comments |
| Nice house in small fishing village in Lofoten | 5/5 | Located in Laukvik, walking distance to Matmora trailhead |
| new! | Modern Apartment located on the quay in Laukvik with a view of the sea and the mountains. | |
| Kabelvag Feriehus and Camping | 8.4 /10 | The best Campsite on Austvagoya, great value for money, very peaceful. Just a short drive from Svolvaer! |
| 5/5 | Beautiful apartment, 5min wal from Svolvaer’s city centre. | |
| Apartment in Svolvaer for up to 4 ppl | 4.8/5 | near the trailhead to Floya & Djevelporten and Blatinden, only a short walk to Svolvaer town centre |

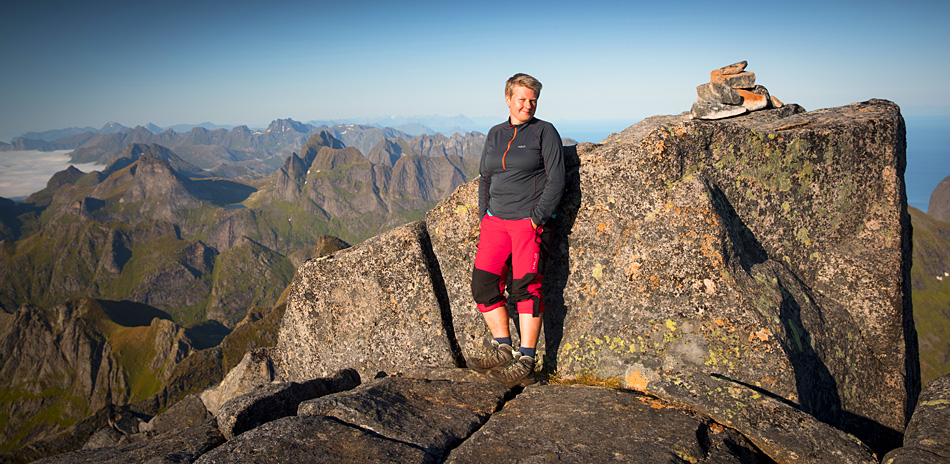
12.Matmora 787 masl
Difficulty: moderate
Distance: 13 km
Time: 6 hours
Elevation gain: 844 metres
Matmora is well off the main Lofoten tourist route, hence it’s a peaceful and quiet hike. Starting at the northern end of Austvagoya island, a hiking trail to Matmora is perfect for those who seek tranquil ambience and solitude. Views along the way are amongst the best of Lofoten!
The hiking trail to Matmora can be divided into 3 sections. Initial steep climb on muddy path thru low woodland to reach a large plateau – the least pleasant section. Although hard going, the height is gained quickly! Once at the plateau, follow its edge towards higher ground and narrower ridge with two rock teeth! That was section 2. Finally past the teeth, start the final climb to the top of Matmora, it’s moderately steep, but not exposed and views are stunning! In no time you’ll be standing at the large cairn (pile of stone) marking mountain top!
Take your time to enjoy the view, it’s amazing in all directions! Having climbed dozens of Lofoten’s mountains we can honestly say that Matmora is the favourite! Thanks to the views along the trail which left us in awe, rugged and dramatic summit panorama with endless mountain ridges stretching between us and the horizon! Hiking experience itself was very enjoyable, with only one other group met along the way! Matmora is located among other beautiful mountains, fjords and lakes, the whole hike is plentiful in stunning viewpoints and breath-taking sights. A day spent hiking to Matmora will be the one to remember and I’m sure you’ll love it as much as we did! If you happen to visit Lofoten in the summer, we recommend hiking to Matmora in the afternoon or evening, to enjoy a never ending warm sunset light illuminating everything in sight! We climbed Matmora in the evening and loved the soft warm evening light, making the views extra-special! Find out more about a hike to Matmora!

13.Festvagtind
by Laura from ‘From Canyons to Clouds’
Difficulty: moderate
Distance: 3.2 km
Time: 2 -3 hours
Elevation gain: 550 metres
Trail up to Festvågtind is a short and steep path to a unique (and epic) viewpoint overlooking the village of Henningsvær.
Often it is referred to as alternative to extremely overcrowded Reinebringen. However, its epic views make is also very busy and desirable peak for hikers. Hence, I recommend starting this hike early if you don’t want to be joined by hundreds of other hikers at the top!
The “trailhead” is on highway 816 and has no parking lot. There is a large car park, just west of the starting point on road 816. It is marked as as “Festvågtind Car Park” on Google Maps (directions)
It is a private, charged car park, payment is via a phone app. If you do not have the ability to download apps in Norway, this car park will not be an option for you. There are many small spots along the side of the road for one or two vehicles, and a small lot for about 6 cars almost immediately past the trailhead.
The hike is about 1.6 km one-way, with about 550 meters of vertical gain. The trail is steep, dry, sandy, and very eroded. Bring hiking poles to help with descent!
When you start the hike, after about 50-100 metres, there is a fork in the trail, keep to the right (this online map will help you). At the next fork stay to the left if you want to head straight up the mountain, and stay to the right if you want to make a stop at Heiavatnet, a small lake used for swimming about halfway up the mountain. I took the route to the left on the way up, and stopped at the lake on the way down.
The hike to the top took about 1 hour, including several water breaks. The rocky summit provides 360-degree views with mountains to the north and east, beautiful blue water to the west, and Henningsvær to the south. This hike is well worth the hour of effort and the crowds!
From Canyons to Clouds @ Instagram

14.Floya 590 masl & Djevelporten rock
Difficulty: moderate/hard with steep initial ascent on the big boulders
Distance: 5.5 km
Time: 3-4 hours
Elevation gain: 560 meters
Floya is the best known hike over the town of Svolvaer, which offers not only a unique experience, but incredible views over the island-based town, and coast! Again, this hike can be a fine alternative to Reinebringen.
Djevelporten can be easily compared to the famous Kjeragbolten near Stavanger. It’s more of a landmark than a viewpoint, which will dare you to step on a rock slab hung over the abyss. Many walkers visit Djevelporten slab on their way to Floya, and so did we.
The top of Floya is an exposed and tricky scramble, however for the best view over Svolvaer you can skip the top and by-pass towards the ridge end, which makes a much greater viewpoint!
Hiking trail to Floya and Djevelporten starts near a nursery in Svolvaer and requires good balance and hands on rock skill as the initial section consists of large boulders which you will have to hike on. It’s impossible to by-pass these large rocks, so it’s best to head on and climb over them.
Having passed the boulders the path, still rough, leaves the woodland and arrived to an open space. Finally you will see the destination, Floya – to the right, and Djevelporten- straight ahead you. The most difficult section is already past you, but to get to the viewpoints and the rock slab is still quite a hike! We recommend heading to Djevelporten first, so ignore all paths forking to the right and walk straight ahead to the narrow gap in rock, ahead. The closer you get to the rugged slopes accommodating Djevelporten, the steeper the path, as it zig-zags thru loose rock. Most likely, there will be a group of walkers awaiting their turn to step on Djevelporten slab, so if that’s your fancy don’t feel disheartened, just wait a bit for your turn!
Continue slight to the right towards the Floya top and ridge, alternatively follow one of the paths towards Floya, for the best views!
15.Blatinden 625 masl
Difficulty: hard with steep initial ascent on the big boulders
Distance: 9 km
Time: 4-5 hours
Elevation gain: 574 meters
All information above applies to hiking Blatinden, but another top -Tuva can be easily added (without much additional effort) once you descent to lake Tuvvatnet from Blatinden.
Despite being the most prominent mountain over Svolvaer, Blatinden is rarely climbed, being in the shadow of Floya and Djevelporten slab. Blatinden offers similar views and shares the initial section of the trail with Floya and Djelevporten, but you’re likely to be completely alone as soon as you leave the main Floya path.
Why should you hike to Blatinden? First of all, it’s a fantastic continuation of a Floya and Djevelporten hike, also Blatinden on its own is a fine hike to the highest top in the area!
To cllmb Blatinden follow the Floya and Djevelporten trail, initially, climb the boulders and once in the open follow the trail ahead to the small pond. At the pond turn left, yes, there is a faint path, marked with red dots every so often, follow it towards the steep slopes of Blatinden. Look out for a rock marked blue, on your right hand side, this is where you should leave the main path and start the steep climb to Blatinden (yes, the ascent path is marked blue).
Immediately you will realise that Blatinden is evidently less popular than Floya, the path is overgrown and hardly visible, but still easy to follow. In no time you’ll reach the ridge with views to eastern Lofoten, as well as good oversight of Floya, enjoy the scenery and use this spot to rest, as the next section, final ascent to Blatinden summit is very steep and requires a lot of effort!
Follow the zig-zaging trail to ascent a grassy slope and in no time you’ll be standing at the very summit of Blainden! We recommend to explore the summit area, climb the rocks and check out various vistas, before continuing further. We can guarantee that you will have a great sense of accomplishment once you step on the top of Blatinden! Looking at the mountain from Floya we imagined it to be hardly possible to climb Blatinden, but yeah, we did it! To return down to quiet suburbs of Svolvaer follow the path on the other side of Blatinden as it runs beneath a small ridge. On your way down, you can walk up to the top of one more mountain – Tuva. Read all about hiking to Blatinden it in this article.
We believe that Blatinden should be the most desired extension to Floya hike, and encourage you all to climb this majestic mountain! Without the crowds of Floya and Djevelporten, Blatinden offers a very fine and quiet hiking experience in the heart of busy Lofoten! One, not to be overlooked!

16.Tuva 477 masl
You can climb this small mountain together with Blatinden, as mentioned above.
However, if you only want to walk up to the top of Tuva, follow this desctiption.
Tuva is the least prominent top in the area, nonetheless it offers a fine hike and stunning views! We recommend to start the hike in Knutvika, quiet neighbourhood of Svolvaer. Using navigation apps (like offline Maps.me or mapy.cz) find your way to lake Gronnasvatnet and find a well defined path at its western shores, this trail will take you steeply up, along a stream, to a saddle between Tuva and Blatinden, just over a large lake Tuvvatnet. It’s a strenuous hike, but view from Tuva will reward your efforts generously!
Why is hike to Tuva worthwhile and why Tuva found a spot on ”the best hikes in Lofoten” list? It’s a fine hike in quiet surroundings, a bit off the beaten track, quite unknown. We only discovered it during a thorough analysis of a hiking map, looking for possible extensions of Floya hike. We stubbornly tried to find a way of climbing Blatinden and then we set our eyes on nearby Tuva,
We believe Floya, Blatinden and Tuva 3 peaks route is the best and most adventurous hike near Svolvaer! Tuva was an integral part of this experience and we were charmed by its views and peaceful trails!
Retrace your steps back to Knutvika, or alternatively extend the hike by climbing to Blatinden (the massive mountain opposite Tuva).
Other experiences you may want to try in Lofoten
RIB Boat Lofoten Trollfjord Sea Eagle Safari – 2h tour with English speaking guide. You will have the opportunity to see the eagles up close and admire Lofoten and Trollfjord from the water. Meeting point Svolvær.
Reine, Hamnøy, and Skariskøya Photo Tour – 8h tour with English speaking guide. Great tour for those who do not drive but would like to visit the hot spots. You will not only have a chance to take great photos but to learn more about Lofoten and hear lots of interesting stories. 3 pickup options: Svinøya Rorbuer, Thon Hotel Lofoten, Thon Hotel Svolvær.
Eggum Lofoten: Kayaking Tour in Lofoten or Skrova Island : 3hours Guided Kayak Tour – does 3h kayaking on Lofoten waters sound good? If so, this activity is for you (weather permitted).
Lofoten History and Sightseeing Tour – 5-hour journey through Lofoten’s captivating history and breathtaking landscapes. Meeting point: Svolvær.

Hi! Thanks for the many reccomendations for hikes 🙂
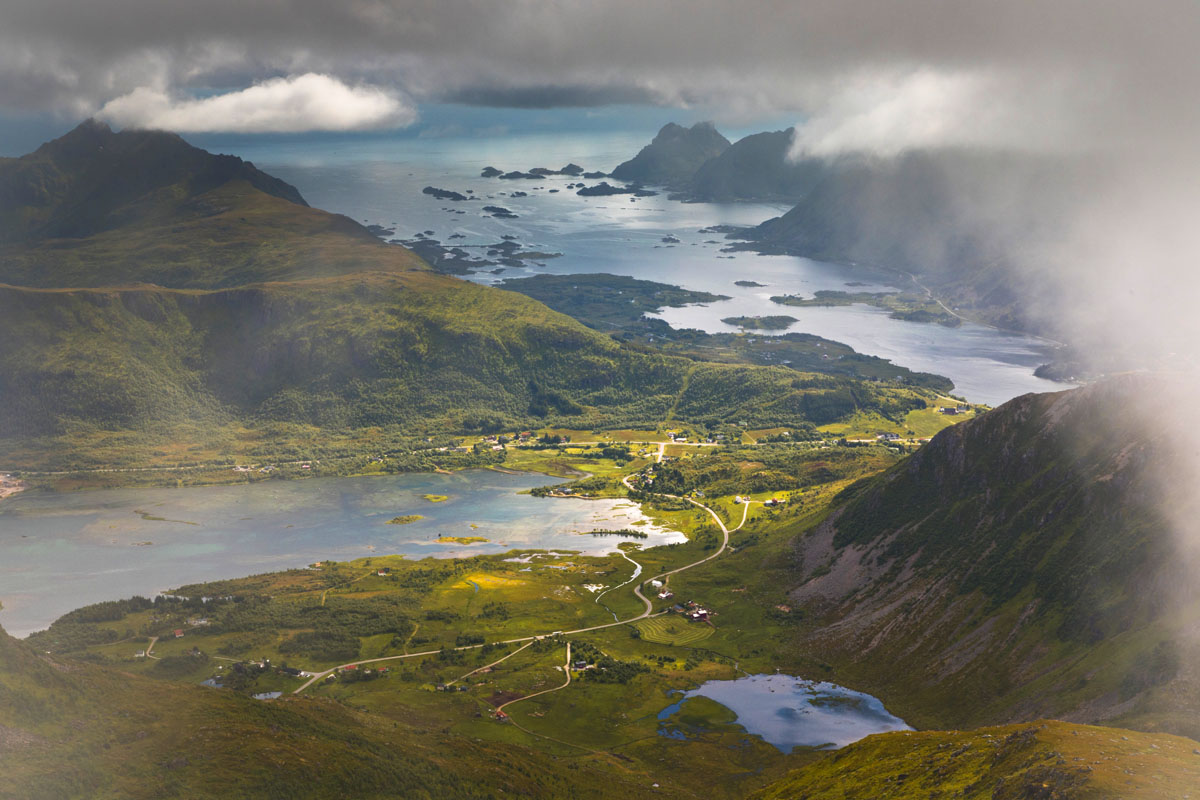
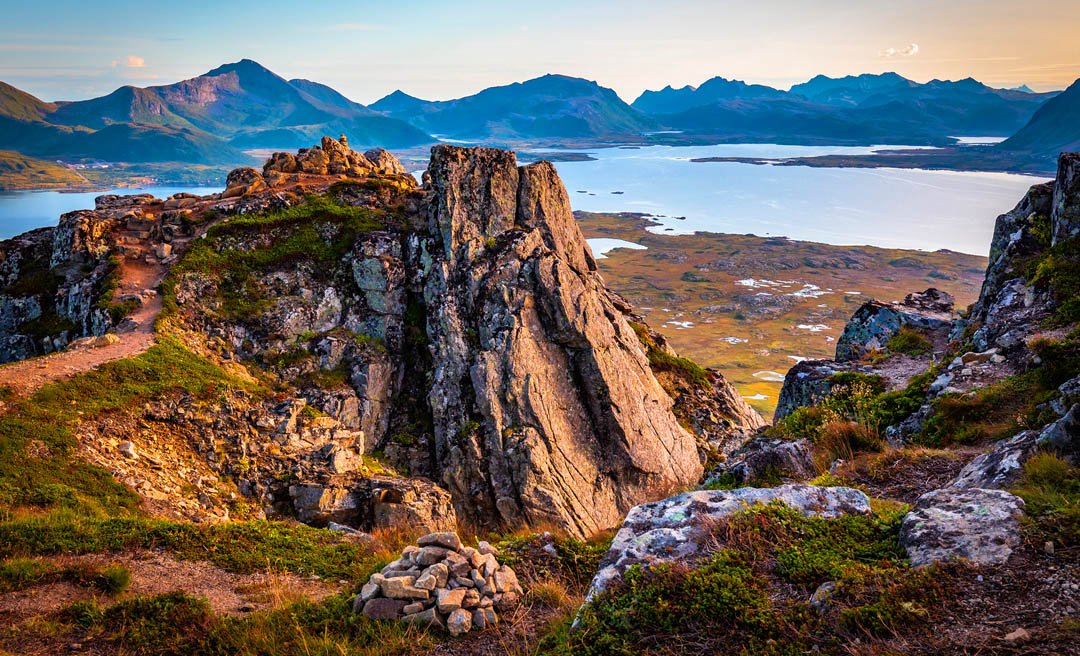
I’m curious, where is the upper picture in this blog taken?
Hi Jill, this photo is taken in northern Austvagoya island, and portrays Grunnforfjorden area. Enjoy the hikes!
This blog was wonderful as we planned our hiking trip to Lofoten in July! Thank you for all the tips and detailed information, they were so useful! We did six day-hikes to six different locations which we picked out based mostly on your stories. (And even recommended your site to some other hikers along the way.) All of the hikes were amazing and we really lucked out with sunshine and warm weather. The trip couldn’t have been better! <3
Thanks for getting in touch Kaisa! We greatly appreciate your message. MOst importantly, we’re happy to have helped you with planning the Lofoten trip and incredibly glad you enjoyed the hikes! Seems that your trip was as amazing as our second visit to Lofoten, when we were blessed with near-perfect weather conditions! All the best!
There’s a lot of effort in this post, very useful. Thanks!
Thank you for your kind words Ed, makes us happy 🙂