
When visiting More Og Romsdal region we really wanted to hike Troll Wall – the tallest rock wall in Europe.
Troll Wall, also known by its Norwegian name Trollveggen, is a part of a magnificent massif of Trolltindane mountain, towering high over Romsdalen valley on the east and famous hairpin Trollstigen road on the west. No wonder it attracts countless hikers, adrenaline seekers, explorers and climbers. The cliffs of Troll Wall are majestic, impressive, and definitely not for the faint-hearted! We were eager to find out for ourselves whether the sheer vertical rock face is as scary as they say, so we set off to Trollveggen to investigate.
Hiking Troll Wall fact sheet
- Height: Stabbeskaret 1431 masl
- Total time: 6 hours
- Total distance: 6 km
- Parking: Trollstigen visitor centre (click here for directions)
- Level of difficulty: 3/5 -moderate, possible some steep sections. Norwegian standards: RED – demanding
- Troll Wall weather: Troll Wall weather forecast
- Which map: Romsdalseggen og Trolltindane nordeca r/v (click here to buy)
Troll Wall or Trollveggen ? Or maybe Stabbeskaret ? Or maybe Bruarskaret? Where are we actually going? A total confusion!
Before we set off to explore Western Norway, we looked for the best hikes in the area and came across the Troll Wall in Romsdalen (or Trollveggen hike). Troll Wall (or Trollveggen) was the name coming up in most searches and hike descriptions, it also was the only name we found on hiking map. However when researching route descriptions we came across intriguing discrepancies in level of difficulty of Trollveggen trail. Some Troll Wall route descriptions briefly mentioned Stabbeskaret hike (moderate level of difficulty), in other descriptions Troll Wall hike was marked as very hard. Two names, Stabbeskaret and Bruarskaret appeared (although rarely) under Troll Wall hike and in fact it was hardly possible to find out more about the two.
At the beginning of our hike we did not exactly know what to expect of the Troll Wall / Trollveggen, we imagined that (as per some descriptions) we will end up ‘on all four’ on an extremely exposed ridge and in very difficult environment. We still decided to take our chances. However when we arrived to Trollveggen Centre we found that the markings and signposts are for Stabbeskaret. Having heard the name before in connection to Troll Wall we believed it was the same hike and were happy with it. Only after a couple of hours hike we realised that some other parties we met along the trail had a guide with them. The confusion was even greater when we noticed that the guided tours were leaving the marked path and traversing more to the left, towards sharp rocky ridge, straight thru a total chaos of large boulders and scree. I think only then we understood the difference between Stabbeskaret, Bruarskaret and the discrepancies in descriptions. Next day, while in a visitor centre, we came across a small guide book of the area and suddenly all made sense. Troll Wall / Trollveggen is a general name of the cliffs, the whole mountain is called Trolltindan. Stabbeskaret and Bruarskaret are points on the ridge, accessible by hikers.
Still confused? In simple words…
…Troll Wall is best admired from Romsdalen, however from this side it can only be conquered by experienced rock climbers. There are two access points for hikers thou, they are really viewpoints to cliffs of Trollveggen and are accessed from the west (Trollveggen Centre). One is called Bruarskaret (there is no marked path and the route is considered very hard and exposed, so most hikers decide to hire a guide), the other one, Stabbeskaret, is the lowest point on the cliff ridge, relatively easily accessible with marked path and also provides great overview of the area and the ridge itself (we ended up hiking this one)

Getting to Troll Wall hike starting point
The Troll Wall hike starts at Trollveggen Centre car park. Good news is that the car park is free of charge and very large, there’s space for hundreds of cars. Despite the size of car park I can easily imagine it getting full in high season as it serves the Trollveggen visitor centre, Trollstigen hairpin road viewing platforms, it also serves as a starting point for several hiking routes nearby.
The car park is very easy to find, actually, you can’t miss it. It is located along road number 63 (also called Isterdalvegen) between Muri and Andalsnes, on the east side, just north of Alnesvatnet lake. Or simply, if driving from the north, climb up the hairpins of Trollstigen and the car park is at the very top; while driving from the south- if you’re already driving down the hairpins, you have just missed the car park! The Trollstigen road itself is fun to drive, definitely a great experience I would recommend. It tends to be busy (also with larger vehicles) but is wide enough for 2 cars to pass carefully, even on bends. Mind you, we witnessed a lorry towing a large tour bus up this road, it was a challenge and stopped the whole traffic for well over an hour, but they made it up (with applause from all the bystanders)!

Hike Stabbeskaret – at the edge of Trollveggen
We have this habit of starting hikes as early as possible, especially longer ones. We have, therefore, arrived to Trollveggen Centre in the morning, early enough to be one of first cars parked. Having parked a bit further from the visitor centre we had lots of space to unpack the camper and cook breakfast outside, on fresh air. All we need before a day hiking is a hearty breakfast; we usually have porridge with nuts, sunflower seeds, honey and raisins. That day, however, we went for an adventurous option – fishcakes (Norwegian: fiskekaker). I’m not sure if the smell of fried fishcakes spreading lazily over the car park was to everyone’s joy, but I found them quite good (Bea thought they were a bit chewy).

After such nutritious breakfast we carefully checked the map once again and set off to hike Stabbeskaret – at the edge of Trollveggen, the lowest point of world famous vertical rock cliff ridge. By no means it’s an easy hike, the terrain can prove challenging and route finding will definitely be difficult in bad weather, so please don’t take it lightly.

The hike starts at the visitors centre and, at first, follows paved trail to Trollstigen viewing platforms. There are three viewpoints, each worth checking out as the Trollstigen road, winding down with hairpins, is something spectacular. We loved the view down to the valley, zig-zags of the road and distant streams and rivers, far down below. I’ve taken countless photographs ensuring to give justice to this unique masterpiece of Norwegian road engineering.
Just before the last, furthest viewing platform, there is a signpost to the right, marked with Stabbeskaret (red). There are a couple of man-made steps to take, then a wide rock ledge secured with chains, no difficulties thou and only very briefly.
The path is flat-ish, wide, well made and easy. It casually runs along the edge of rock, at a distance. The views to Trollstigen and Stigfossen waterfall are fantastic, so the beginning of the hike reminded me of a nice, Sunday stroll. Not for long thou! As the path approaches the stream, it becomes steeper and steeper, in fact this section, made of fine loose rocks, is the steepest part of the hike (steeper than final climb to Stabbeskaret itself).

Finally our path levelled out, we still climbed up but very gently. The terrain has changed too. We have now entered a new world, it seemed. All around there was just grey rock, grey boulders and grey mountains. Quite a moon-like experience!

We crossed a little stream and arrived to another signpost; ahead to Stigbotnvatnet lake, left to Stabbeskaret. We followed the path thru boulder field. I’m not sure if I could still call it a path, it was clear enough where to go, the stones were evened in a way, maybe by countless steps of hikers before us… but, as pictured above, it was a rough way and I was grateful to have proper hiking boots to keep my feet stable, especially ankles. Also, even thou the way was still marked with red ‘T’ (standard Norwegian route marking system) there were numerous little cairns (piles of stone) and thanks goodness for that, as it was sometimes easier to spot a cairn than a red ‘T’. Yep, spotting the route markers was tricky sometimes, little red Ts were not always clearly visible, but even when we struggled to spot ‘the next’ mark, we could always spot some other ones a bit further in the distance and head towards them.


The boulders had no end. As we progressed further, there were only grey boulders, smaller and larger. Boulders, boulders everywhere. All we could see were just grey mountains made of grey rock and, yep, you guessed right, more grey boulders on the horizon! And there we were, in the very middle of it all, trying to find our way thru the sea of rough rock.

The hike was not boring at all thou! OK, I keep talking about the grey sea of rock, it was totally dominating the landscape, but there was a lot of beauty to it. There’s something special in rough, raw nature, and while hiking Stabbeskaret we felt exactly that. Some raw power of nature, wild and undiscovered. How fascinating! It felt a bit moon-like, a totally different feeling to Sunnmore Alps which we visited previously; no fjords in sight, no lush greens.
Having hiked further up we climbed up to another small valley between high mountains. We were then surrounded by rocky summits, a nice addition to the rough landscape were little glacial lakes. Crystal clear water reflected deep blue sky and the final effect was crazy, unreal. It was a perfect spot for a break, we rested there, enjoying the silence, the wind and the sun. In fact, this place is actually called ‘Breakfast Point’ (Frokostplassen) and is even marked as such!


We could already see Stabbeskaret in the distance, it was a promise of great views to come. I thought it was still far away, but eventually we reached it much quicker than I anticipated. As we have already climbed most of the height, the remaining part was quite easy. One last surprise was a little shelter hidden between massive boulders. We almost missed it, but there it was, a heavy roof made of a great flat slab, seated on even heavier rocks. The whole thing was so unreal! It’s amazing how the grey sea of rock can provide so much excitement, joy and fun! We loved every minute of this hike! To my surprise, walking all the way on these rough boulders was not a problem, quite the opposite, they made good steps and made it easier to gain height quickly, I actually liked it.

Then, before we knew it, we reached Stabbeskaret! How did it feel? Amazing, fantastic and scary!
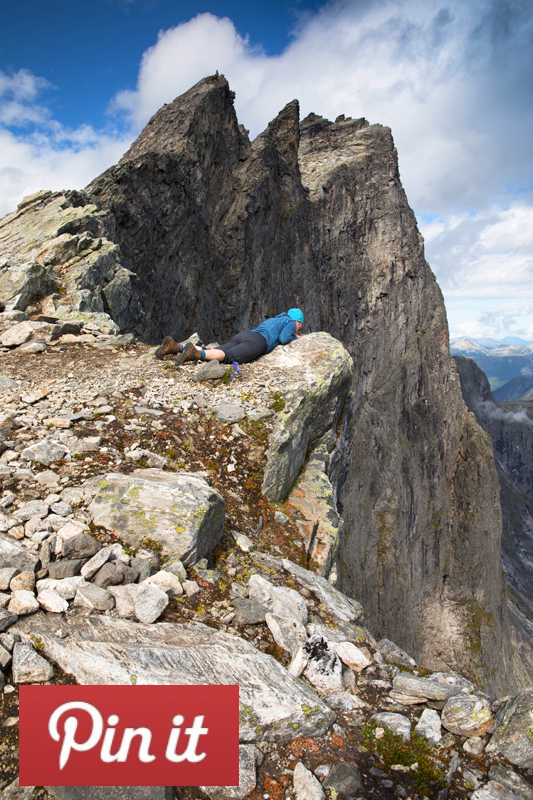
With a little bit of hesitation we looked over the edge. These are the highest cliffs in Europe. Yep, they were impressive to say the least. I looked down and thought that hungry or not, I won’t be able to look down and eat at the same time. Every time I looked down, my stomach felt a bit sensitive. The drop to the bottom of Romsdal valley which lays beneath these majestic cliffs is breathtaking, never-ending, scary. Did I say ‘scary’ again??!?! I admit, I had to lay down on the ground to be able to stick my head over the edge, to look down. I almost asked Bea to keep hold of my feet, just in case 🙂 The distance between me and the valley seemed to grow, the longer I looked. I loved it thou, really liked the view. We were both really happy to have reached Stabbeskaret!

 Romsdalen. Ridge at the end of this valley, Romsdalseggen, is one of the best hikes in Norway (click to read all about it!)
As always, we left a note in the hikers ‘guest book’, check it out and find us under date 9/8/18. I love these guest books and leave little notes or greetings with pleasure.
Looking over the cliff edge we saw Romsdalen valley. It looked so rich, lush greens and emerald water of river Rauma. Romsdalen is one of the longest and most beautiful valleys in Norway. There is a train line running along it and I would love to take a train journey from Andalsnes to Dombas, I imagine it would be amazing!

I didn’t want to go back. Why on earth would I ever want to leave this divine place?! We had it all to ourselves for well over an hour, having lunch, laying on the slabs and enjoying the sunshine, checking out the sheer drop to Romsdalen again… We had to start the return journey thou, it was a long way back down.

In an introduction to Troll Wall I mentioned Bruarskaret viewpoint. It’s an alternative destination point on the Troll Wall (Trollveggen) ridge. Unlike Stabbeskaret, it’s a difficult hike, most sources recommend hiring a local guide to climb it. Although most of the hike is the same for Stabbeskaret and Bruarskaret, the trails divide past Frokostplassen. It’s an unmarked fork and easily missed. In such terrain (rough rock) it’s really easy to loose way or overlook a fork, especially when the route is not marked. We could see a faint path (just a faint line in the distance) but it seemed very elusive. Bruarskaret is not signposted, unmarked, therefore once again, I advise to prepare very well for this climb or hiring a guide. It is known to be extremely steep, very exposed and difficult to navigate. It’s also hardly possible to find any detailed information on Bruarskaret, apart from single local guide books.
Wild camping near Troll Wall and campsites information
After the hike we faced the daily dilemma of finding a place to sleep. Trollstigen and Romsdal areas are a bit tricky to find a spot to wildcamp.
In Romsdalen there is one good spot where wild camping is not forbidden – car park next to Trollveggen Besokssenter along road E136 (it’s large, there are large log-wood tables on the side and a toilet available at Trollveggen Stasjon 7.00 – 21.00 just a 100 metres away).
Along the Trollstigen road (road number 63) it’s hardly possible to find a decent wild camping spot between Trollveggen Centre and Andalsnes. There are two campsites thou. We have visited them both and can advise on which one is better.
First one is called Trollstigen Camping. It’s next to the road (on west side), well visible from afar, signposted. The reception/cafe and facilities buildings are grass-roofed, there is a large car park. This campsite was costly, 200 NOK (240 NOK with electricity).
The other campsite Trollstigen Resort, was the one we chose to stay at (and then to stay an additional day!). It was located a bit further, on the junction of road 63 and 174, in Soggemoen, literary 5 minutes drive further from the first one. The buildings were not so well visible from the road (entrance to the campsite is just around the corner, from road 174, easy to find) This campsite had a wow factor. Apart from decent facilities, good campground and huts, very friendly staff, they also provided (free of charge) fire wood for grills and bbqs, and there were many located in all parts of campsite. Wi-fi signal was very good even thou we camped in the furthest corner of the grassy area. Not to mention the price, which was 175 NOK for a camper (electricity included). If I am ever in the area again I will definitely stay in the Trollstigen Resort.


Troll Wall routes and Troll Wall hike map

Other hiking ideas in More Og Romsdal area
If you’re already in the area and looking for other fantastic hike ideas why not try magnificent Saksa mountain (click here) or Slogen (click here) in Sunnmorsalpen / Sunnmore Alps) or Romsdalseggen ridge hike (read about it here), which is believed to be one of the best ridge walks in Norway.
What we loved about Stabbeskaret
The unique moon-like experience, views to world-class rock cliff as well as lush green Romsdalen valley, famous Trollstigen hairpin road no 63 make this hike an unforgettable experience!
*Level of difficulty explained: 1– easy walk, mostly flat 2-easy hillwalk, good path 3-moderate, possible some steep sections 4-long hillwalk, possibly some scrambling involved, possibly pathless 5-difficult, possibly pathless, long, requires technical skills
NORWEGIAN DIFFICULTY LEVEL EXPLAINED: GREEN – easy, BLUE -moderate, RED – demanding, BLACK -expert
