
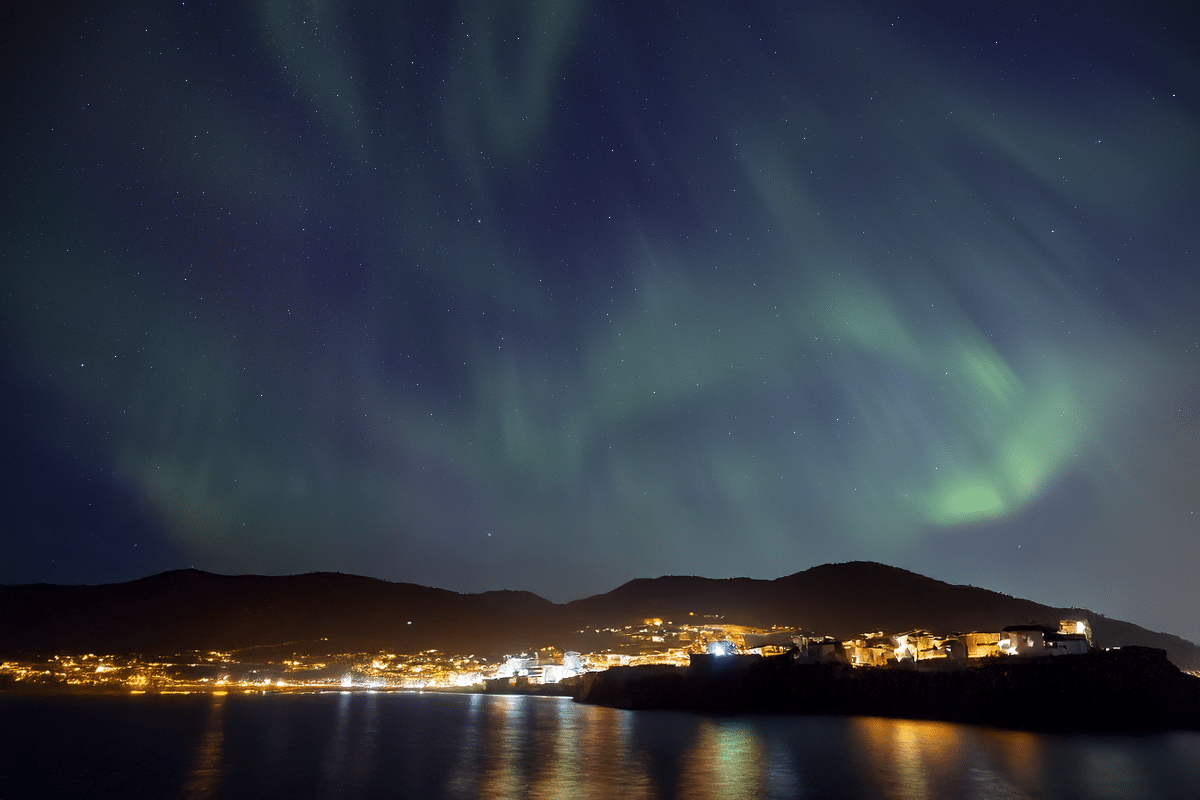
Northern lights have already fascinated people in ancient times; bright colours illuminating dark winter skies have always been present in folk art and mythology. Depending on the region, in the past people believed that Aurora Borealis was created by a firefox running quickly thru the snow, or carriages drawn by celestial horses for an out-of-this-world wedding, souls of warriors, stillborn children or even dragons!
We are still under the spell of Aurora Borealis, however, nowadays we fully understand its origins, and have modern, digital technology to help us predict, capture and cherish the phenomenon.
I have always dreamed of seeing the northern lights, and since I am a passionate photographer, I also hoped to capture the Aurora one day. First time it happened I was over the moon, although the show wasn’t particularly spectacular and my first photo of Lady Aurora was crap, to be frank.
Since then I focused on chasing the northern lights (with great success!) and learned a lot about the phenomenon as well as developed necessary skills to take incredible photographs of Aurora.
Although seeing Aurora depends on only 3 factors (solar activity, dark sky and clear sky) it’s not that easy and requires a bit of knowledge, understanding and preparation.
In this article I am sharing in-depth knowledge (in plain English!), professional skills and tips necessary to see and photograph northern lights, without the need of booking expensive tours! Yes, you can successfully go chasing Aurora for free, assuming you have some knowledge and understanding of this unique miracle of nature!
Follow this easy step-by-step guide to capture stunning photos of northern lights, without booking expensive arctic workshops!

HOW TO PHOTOGRAPH NORTHERN LIGHTS – ULTIMATE GUIDE
1.What are northern lights?
2.Where to see northern lights
3.Best time to see northern lights
4.Gear and equipment for northern lights photography
5.Get to know your camera’s manual settings
6.Preparing your camera to photograph northern lights
7.How to prepare yourself for northern lights photography
8.Predicting solar activity and Aurora Borealis – the best northern lights forecast apps and websites
9. What you see by naked eye versus what your camera sees
10. Best camera settings for northern lights photography
11. Northern lights photo post processing tips

1. WHAT ARE NORTHERN LIGHTS?
Northern lights, Aurora Borealis or polar lights (and southern lights in the Antarctic region of the southern hemisphere) can be observed when the gas-charged particles coming from the sun collide with Earth’s magnetic field.
Sounds too dry? Below is Aurora explained in plain English!
Our sun is built of gas. Imagine that very often there are explosions on the surface of the sun. Each explosion sends particles charged with gas into space. Depending on the explosion scale, these particles arrive at Earth with greater or smaller speed and force; it’s called ‘solar wind’. When they arrive to Earth, they first collide with our planet’s magnetic field. This is when we can see the northern lights. The colours we see (green, purple, red) depend on the gas that solar particles are charged with. Stronger explosions send more particles into space and the Aurora displays are more spectacular.

2. WHERE TO SEE NORTHERN LIGHTS
2.1 Best countries to see northern lights
Travel companies won’t ever tell you this secret, but you don’t really have to go ‘far north’ to see northern lights! Did you know that couple of times a year Aurora Borealis can be seen as far south as England, Scotland, southern Sweden or Estonia? Yes! With a bit of luck you have a chance to capture northern lights without travelling to northernmost Norway or Iceland! Sounds amazing? Continue reading to find out what to do exactly to have a chance of spotting Lady Aurora further south!
If, however, you’d like to increase your chances of seeing a full-blown northern lights show, you should consider a trip to ‘The North’, polar lights are best watched in high latitude regions.
These countries are the best locations for Aurora watching: Norway, Finland, Sweden, Iceland and Canada. The further north, the better chance of seeing the lights and of a more spectacular show. I will also add Scotland to the list, as I have witnessed several amazing Aurora displays in Scottish highlands, as well as east and north coast.
2.2 Choosing the best location for northern lights photography
When planning your Aurora spotting night, you should pick a location with great care. So, what are the best places to capture the northern lights?
Firstly, ensure to have a spot with an un-obscured view towards the north, or pick a vantage point on higher grounds. Most Auroras are displayed between the horizon and 30 degrees over, therefore ideal watching spots are beaches, coasts, plains or viewpoints over the open sea. However, the strongest Aurora displays can illuminate the whole sky!
Secondly, to see the polar lights you need a ‘dark sky’. It usually means waiting a couple of hours after sunset. But it also means finding a spot with as little light pollution as possible. This could be a field outside of the village, a solitary viewpoint along the road or a beach. However, the strongest Aurora displays can also be watched from your garden or terrace, despite the village lights!
Thirdly, purely for photography purpose, when picking a spot you may want to consider a location with an interesting foreground. This will make your photo look more professional and artsy!
3. BEST TIME TO SEE NORTHERN LIGHTS

Despite the constant solar activity throughout the year, northern lights are not visible for a couple of months, simply because the sky does not get dark enough in summer. Good news is that the phenomenon can be observed from mid-August / early September until late April / beginning of May.
Assuming solar activity, polar lights can be spotted as soon as it gets dark (which is very early in mid-winter!) and can last throughout the night. Sometimes the lights cease for a couple of hours only to come back later in the night. So if you think you’ve just missed the show, try to wait for a couple of hours somewhere warm; northern lights may be illuminating the sky again that night!
4. GEAR AND EQUIPMENT FOR NORTHERN LIGHTS PHOTOGRAPHY
4.1 Camera with manual settings
In order to capture the northern lights you’ll have to use a camera with manual settings option. Aurora shooting requires manual adjustment of exposure time and aperture, ISO, noise reduction, white balance and manual focus.
I have used Nikon D300 in the past, but recently changed to Canon EOS 5D mark IV and find it perfect for night photography.
4.2 Fast wide angle lens
Fast wide angle lens are ideal for night photography. The best lens to photograph northern lights are the ones with minimum aperture f/1.8 –f4. When it comes to zoom: the widest the angle the better.
At the moment I use Canon EF 16-35mm f/4L IS USM, but in the past I also used Nikon 17-55mm f/2.8
If you’re looking to start your adventure with night photography and wondering which lens to add to your gear set, below are some ideas:
Best Canon lens for northern lights and night photography are: Canon EF 16-35mm f2.8L III USM Lens (or alternatively ‘f/4’ version of the same lens, which is half the price of f/2.8 and famous for being one of the sharpest lens ever), Canon EF 24-70mm f2.8L II USM and Canon EF 11-24mm f4L USM
Best Nikon lens for northern lights and night photography are: Nikon 14-24mm f2.8 G AF-S ED and Nikon 12-24mm f4 G AF-S IF-ED DX
4.3 Tripod
To photograph northern lights you’ll need to apply long exposure times, hence setting your camera on a sturdy tripod is essential to achieve sharp images! I usually travel light and use a standard Manfrotto BeFree tripod, which is sufficient in most situations.
4.4 Remote release
When using long exposure times, it’s vital to ensure that the camera is perfectly stable. Even pressing the camera shutter release button does destabilise it! To avoid blurred images, it’s best to use a remote release, either corded or infra-red. I use a simple, corded Canon RS-80N3 remote release.
Alternatively, if you don’t have a remote release, you can use camera’s in-built ‘shutter release delay’ function; explained in detail in the next chapter ‘5. Get to know your camera’s manual settings’.
4.5 Spare battery
Long exposure photography uses a lot of battery power. Adding the fact that Aurora shooting usually means spending a lot of time in low temperatures, your camera battery is very likely to drain quickly. Make sure to always have a newly charged and a spare battery with you; I can’t imagine anything worse than running flat in the middle of an awesome northern lights show!
4.6 Spare memory card
Another disaster you definitely want to avoid when chasing the northern lights is a full memory card. Night photographs are likely to be size 30 – 50 MB each, hence I recommend always having a spare camera memory card, just in case.
4.7 Enthusiasm!
And last, but not least – you need a lot of enthusiasm to be standing still for hours and hours in cold wind trying to capture THAT perfect Aurora Borealis photograph! Good luck!

5. GET TO KNOW YOUR CAMERA’S MANUAL SETTINGS
As I mentioned above, in order to capture the northern lights you have to manually adjust your camera settings. As most digital camera makes (and models!) have a different access path to these functions, I won’t be detailing them in the article. So whether you’re using Canon, Nikon, Olympus or Sony and are unfamiliar with functions I mention below, refer to your camera’s manual; there you’ll be able to learn how to alter these in your camera.
I recommend ‘playing with manual settings’ at least a couple of times before heading to an Aurora hunt, so you’re confident and can make quick adjustments during the show. Because YOU ARE most likely to make further adjustments when polar lights display is already on. And trust me, you don’t want to miss a fantastic corona shot only because you forgot how to quickly change ISO!
5.1 ISO
ISO is the equivalent of ‘film sensitivity’ in analogue cameras which ruled the photography world in pre-digital era. Very simply speaking, nowadays we can control how sensitive to light is camera’s sensor. In low light environment the sensor needs to be set to ‘more sensitive’ to better detect light and reflect shapes and colours. For best results in night photography set ISO between 800 and 3200; but it is not uncommon to use ISO as high as 6400!
Keep in mind thou, that the higher the ISO, the worse the image quality. With ISO set on 3200 or 6400 you can expect quite an amount of noise on your photo; therefore you might want to apply ‘noise reduction’ option (explained further).
5.2 Exposure time
Exposure time is the amount of seconds (or fraction of a second) when the camera sensor is exposed to light coming thru lens. In most models, 30 seconds exposure is the standard maximum (for longer exposure times you will have to use remote release with ‘lock’ button). I believe that 30s exposure is more than enough to shoot polar lights. Depending on the intensity and how fast the Aurora is moving (vertical beans dancing in the sky) you should set the exposure time between 10 and 30 seconds.
Keep in mind thou, that with wide angle lens zoomed to the widest (let’s say 14mm) the exposure time shouldn’t be more than approx. 25s, as it will result in getting ‘star trails’ (stars will be captured as white horizontal lines) rather than sharp ‘dot’ stars! Consider it, to avoid unwanted effects on your Aurora photographs.
5.3 Aperture
Aperture controls the amount of light getting thru the lens to the sensor. In simple words – how much the lens ‘open’ when taking the picture. In night photography it is essential to let as much light to the sensor as possible. Therefore the best lens to photograph northern lights are these marked with f/2.8 to f/4, set on the maximum aperture.
5.4 Delayed release
I recommend taking your polar lights photos ‘touch-less’, to ensure maximum stability of the camera. If you don’t have a remote release gear, you can use camera’s in-built ‘delayed shutter release’ function (it’s the same setting as for taking a photo of yourself when the camera is fixed on tripod). Ensure to get familiar with this useful function! The delay should be set to 10-15 seconds.
5.5 White balance
White balance is a function responsible for realistic colours on the photo, and it should be adjusted with accordance to the shooting light environment. In simple words: when taking photograph in bright sun, white balance should be set to ‘sunshine’, to ensure that the colours are truthfully reflected on the picture (whites stay white, greys stay grey and don’t turn into sepia etc). To photograph northern lights white balance should be set to ‘auto’ or alternatively manually set to somewhere between 2800 and 4000 Kelvins (function available in semi-pro and pro DSLR cameras). If you forget to adjust white balance before your Aurora session, don’t worry, you can still fix it during post processing.
5.6 Noise reduction
‘Noise’ are the grey (or colourful) small dots, and as much as they can be a desired effect on ‘artistic work’, they’re totally annoying and unwanted in night photography.
Depending on the quality and advance of your camera, when shooting on high ISO, you should expect increased noise on the final photo. This, however can be controlled in two ways.
Most digital cameras do have a ‘nose reduction’ function which can be manually activated and adjusted; professional DSLR cameras have advanced noise controls. Nowadays I use Canon EOS 5D mark IV and I can honestly say it’s awesome when it comes to high ISO image quality; even at ISO as high as 6400 the images are of very decent quality!
But if you’re using a beginners camera (or an older model), camera’s noise reduction can be ineffective or very basic. Don’t worry then, as you still will have some kind of noise control when ‘developing’ the image in Photoshop or Lightroom.
5.7 Shoot in RAW
Shooting in RAW format will allow you to make the most of the information contained within the original file. Any mistakes you made when capturing northern lights can be easily corrected; for instance adjusting white balance or exposure, advance sharpening. Also you can ‘develop’ RAW files countless times (and different ways) without quality loss.
6. PREPARING YOUR CAMERA TO PHOTOGRAPH NORTHERN LIGHTS
Last preparations for Aurora Borealis photo shooting:

- Remember to remove all filters screwed on your lens! Even the most neutral filter isn’t perfectly transparent and clear. You’re after all the natural light you can possibly get from the scene.
- If your camera has a theme set (for example: ‘Landscape’ which emphasises greens and blues, or ‘Portrait’ which softens the scene etc) ensure to set it either to ‘neutral’ or ‘fine detail’. You don’t really want your camera to tamper with the scene in any way. If you decide that final photograph needs adjusted (colours, contrast etc) you can best do it during post-processing.
- Switch off lens stabilisation! Ensure the stabiliser is always inactive when taking long exposure photographs, otherwise the photos can be blurred.
- Switch to manual focusing. Auto-focus is very unlikely to work correctly in the darkness, therefore you should always focus the lens manually when taking photographs in low light
- Set focus manually to ‘infinity’. In order to capture a sharp image of northern lights, lens’ focus should be manually set to ‘infinity’. This sounds easy, but in fact it’s tricky; turning the lens to the ‘infinity’ mark does not guarantee taking a sharp picture! In most cases the true infinity is a bit closer than the mark itself. So to ensure the night images are 100% sharp test the infinity focus during the day (auto-focus your lens on a daytime sky or far horizon and mark the exact spot on your lens for future reference). Then, when capturing polar lights, manually turn the lens’ focus to the exact spot.
- Adjust your camera display brightness. For night photography the display should be a little bit darkened. Leaving the default brightness setting which is perfect for day photography, will ‘lie’ to your eyes and you are likely to accept underexposed images.
- Avoid breathing on the camera when shooting in cold weather; also refrain from touching the lens glass with warm hands! Having even the small amount of condensation can lead to frost on the lens (very difficult to get rid of!) and can ruin your Aurora session.
7. HOW TO PREPARE YOURSELF FOR NORTHERN LIGHTS PHOTOGRAPHY

In all that enthusiasm about photographing Aurora Borealis we often forget that apart from preparing the gear, we also have to prepare ourselves! When capturing northern lights you are most likely to stand still for hours and hours in cold winter/autumn wind. From my own experience I can assure you, that you won’t just take 10 photos and leave. You’ll totally forget about the temperature and time, and you won’t even feel cold, until the show ends. And this can take several hours (and hundreds of photos). Therefore you have to ensure that your dream polar lights photo session won’t cost you a pneumonia!
When heading for winter night photography session, always dress very warm: wear the warmest winter jacket you have; remember about a hat, warm windproof gloves and thick socks (you may need 2 pairs!). Thermal underwear comes in very handy too. Keep in mind that being stationary for prolonged time will make you feel much colder than when walking around during the day!
What else to take with you: a flask with hot tea (or coffee) and snacks, gel hand warmers, headlamp / head torch
And last, but not least – you have to be flexible and spontaneous when planning to photograph polar lights. Very often solar activity peaks and drops rapidly, so you may have to be ready to ‘drop everything’ and run outside or (safely) drive to your chosen vantage point without much warning.

8. PREDICTING SOLAR ACTIVITY AND AURORA BOREALIS – THE BEST NORTHERN LIGHTS FORECAST APPS AND WEBSITES
Luckily, predicting the northern lights is not ‘blind shooting in the dark’ anymore, quite the opposite! With advanced technology at our service, we are now able to foresee and estimate the solar activity, speed and direction of solar wind (read more about it in ‘1. What are northern lights’ section). Northern lights forecasts have never been more accurate!
For a polar lights photo hunter, the most important information is: what are the chances of northern lights this night, is the solar activity strong and approximately what time?
We can now access and assess this information via dedicated websites and smartphone applications! So, the polar lights forecast is at hand, anytime, anywhere. As I previously mentioned, solar activity can pick up without too much notice, hence close monitoring of aurora forecast apps can be vital to succeed.
The best northern lights forecast websites are:
– Icelandic Met Office (for Iceland only)
– Aurora Service (worldwide)
– Aurora Alerts UK (UK, Iceland, Norway, Sweden, Finland)
The best northern lights forecast apps are:
– Glendale Skye Auroras (free). Real time northern lights forecast and information for UK, Iceland, Norway, Sweden, Finland; live solar activity updates. The most accurate app I came across! Available for download HERE
– Aurora Watch UK (free) Available for download HERE
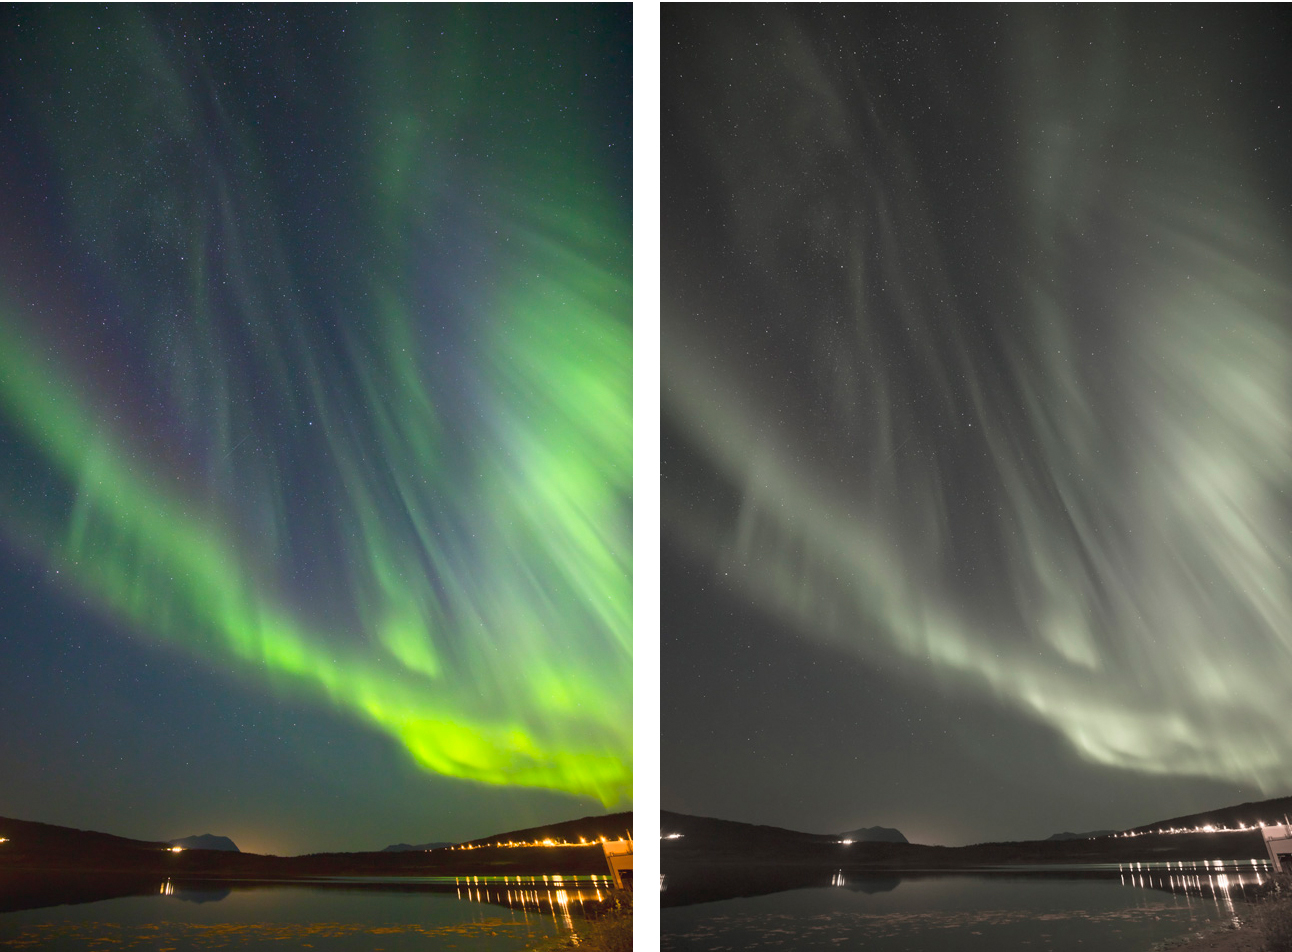
9. WHAT YOU SEE BY ‘NAKED EYE’ VERSUS WHAT YOUR CAMERA SEES
When going Aurora hunting first time, very often people are not aware that northern lights seen by ‘naked eye’ greatly differ for the photographs they saw online or in magazines.
Human eye is not sensitive enough to detect the Aurora’s light wave frequencies. This results in seeing polar lights ‘black&white’ or ‘grayscale’. Very often the lights are mistaken for clouds. Only when the Aurora display is very strong, and is observed ‘far north’, the colours appear visible to human eye. Otherwise it’s most likely to be a grey or faint green display.
Digital camera sensors, on the other hand, are designed to capture the faintest light frequencies and changes. Therefore, digital sensors register and reflect much more colour than the eye! Thanks to the advanced technology we can capture vibrant green, purple, reds and even whites of northern lights displays!
Someone may ask, then, how to distinguish ‘regular clouds’ from northern lights, as both appear grey on the night sky? The easiest way is taking a sample photo and analysing sky colours – for aurora the base colour is green. If the sample photo reflects orange or red lights – this is just an unwanted light pollution coming from towns and villages, not the Aurora, sorry! Also, the clouds don’t really dance in the sky in all directions, but rather move in a stable, predictable manner. I can assure you, however, that if you see northern lights once, next time you’ll instantly know whether you’re looking at regular clouds or polar lights.

10. BEST CAMERA SETTINGS FOR NORTHERN LIGHTS PHOTOGRAPHY
There isn’t a one simple answer to this question. The best camera settings for northern lights depend on how strong the solar activity is and how fast the lights are moving thru the sky.
You will have to apply different camera settings to capture weak activity and slow moving aurora; and different settings for strong activity and fast moving lights and beams. I will go thru the two options in details, below.
Best camera settings for weak solar activity and slow moving northern lights
Aperture f/2.8 (or the lowest value your lens allow)
Exposure time 20 seconds
ISO 1500
Final adjustments during the show:
– if you find photos overexposed (too light) first decrease ISO value to 800; if the photos are still a bit too light shorten exposure time to 15 second
– if the photos appear too dark (underexposed) increase ISO value up to 2500, then change exposure time to 25-30 seconds if necessary
Best camera settings for strong activity and fast moving northern lights with vertical beams and corona
Aperture f/2.8 (or the lowest value your lens allow)
Exposure time 10 seconds
ISO 3200
Final adjustments during the show:
– if you find photos overexposed (too light): shorten exposure time to 6 seconds, then decrease ISO to 2500. If photos are still too light, shorten exposure time further.
– if the photos appear too dark (underexposed) increase ISO value to 4000
Remember, for fast moving northern lights prioritise decreasing exposure time rather than ISO. This will allow you to capture Aurora’s structure and beams better. If you set longer exposure time (let’s say 25s), the final photograph will reflect the average of light movement within these 25s and you’ll end up with an ‘unstructured green blob’ rather than sharp and well defined beams and lines.
11. NORTHERN LIGHTS PHOTO POST PROCESSING TIPS
Having finally taken your dream photo of Aurora Borealis it’s time for post processing and minor adjustments. If you shot the picture in RAW format, the adjustments are especially easy to make!
Below I’m sharing several PRO post processing tips and tricks!
Basic adjustments:
– temperature (white balance), in this case image looks perfectly natural at 4950 Kelvins
– exposure – if the image is slightly under or over exposed
– clarity – set between 50 and 100, so the Aurora structure and edges are even sharper
Tone curve adjustments: you can add a little bit of contrast and definition by increasing ‘lights’
Detail adjustments: noise reduction – move luminance indicator to approx. 20
Don’t adjust: ‘fill light’ – this will only add more noise, ‘saturation’ – too saturated Aurora colours look too unnatural and fake
You have now reached the end of this easy, step-by-step guide to night photography! I hope you found it helpful!
If you think we should cover any section in more detail, or add more sections, drop us a line!
